A small craft room can feel chaotic fast — supplies multiply, surfaces disappear, and suddenly you’re spending more time hunting for your glue gun than actually crafting. The good news is that a little structure goes a long way, even in the tiniest space. Here’s how to get your craft room working for you from the floor up.
This post may contain affiliate links. As an Amazon Associate I earn from qualifying purchases. If you click and buy, I may receive a small commission at no extra cost to you. Read our Disclosure Policy
Assess Your Space and Needs
Before buying a single storage bin, take stock of what you’re working with. A little prep here will save you from reorganizing twice.
1. Take Inventory
Pull everything out and lay it all out. Go through paints, fabrics, markers, paper, tools — everything. Be honest about what you actually use. Group similar items together (sewing materials, scrapbooking supplies, painting tools) so you can see how much space each category needs.
Pro tip: Use this as a chance to toss dried-up paints, scraps of paper you’ll never use, and anything broken or expired. Decluttering now makes everything else easier.
2. Understand Your Crafting Habits
Your craft room should reflect how you actually work.
- Sewers need easy access to a machine and space to cut fabric
- Painters and drawers need a well-lit workstation with brushes and paints within reach
- Scrapbookers and card makers need paper, stamps, and embellishments stored flat and accessible
If you dabble in multiple crafts, keep your most-used supplies front and centre — less-used items can live further away.
3. Map Out Your Space
Measure the room and note every usable surface — walls, corners, the back of the door. Sketch a rough layout showing where each supply category could live. It doesn’t need to be perfect, just enough to plan your storage before you buy anything.
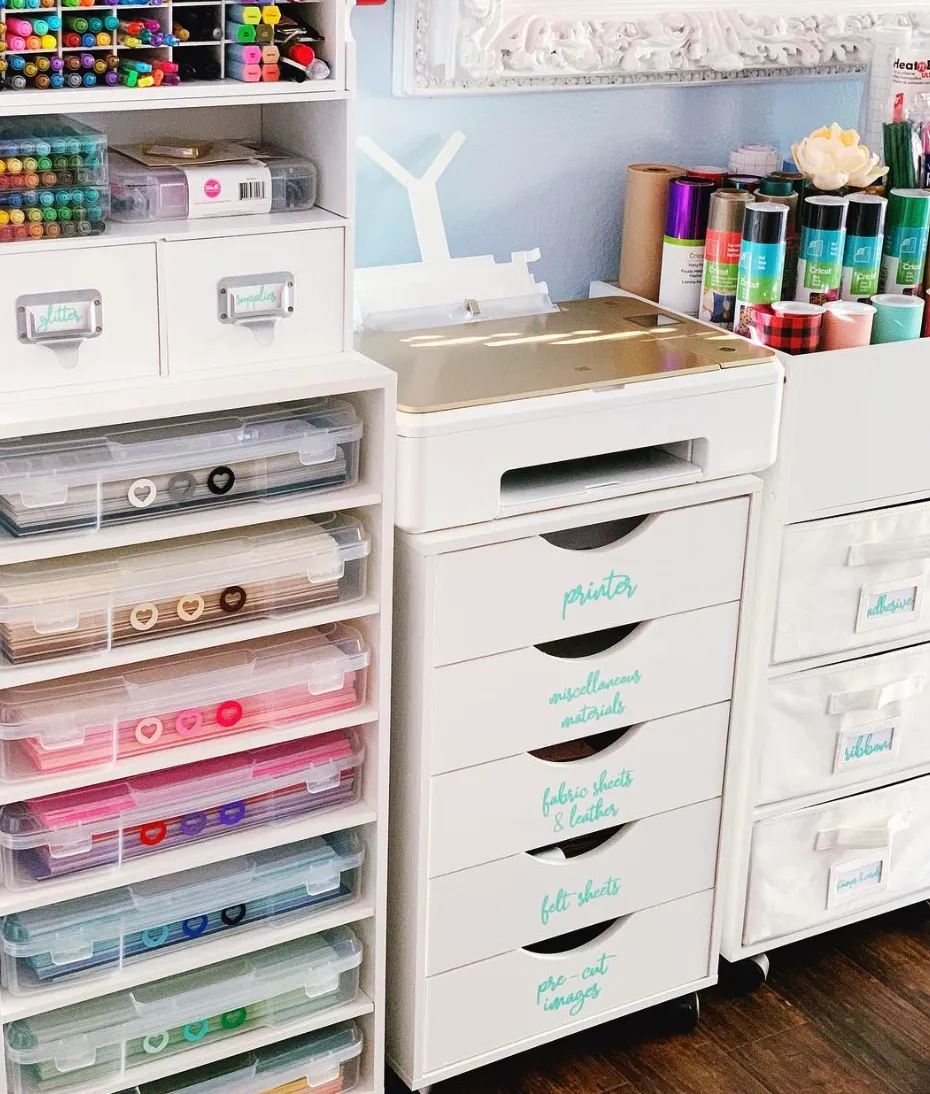
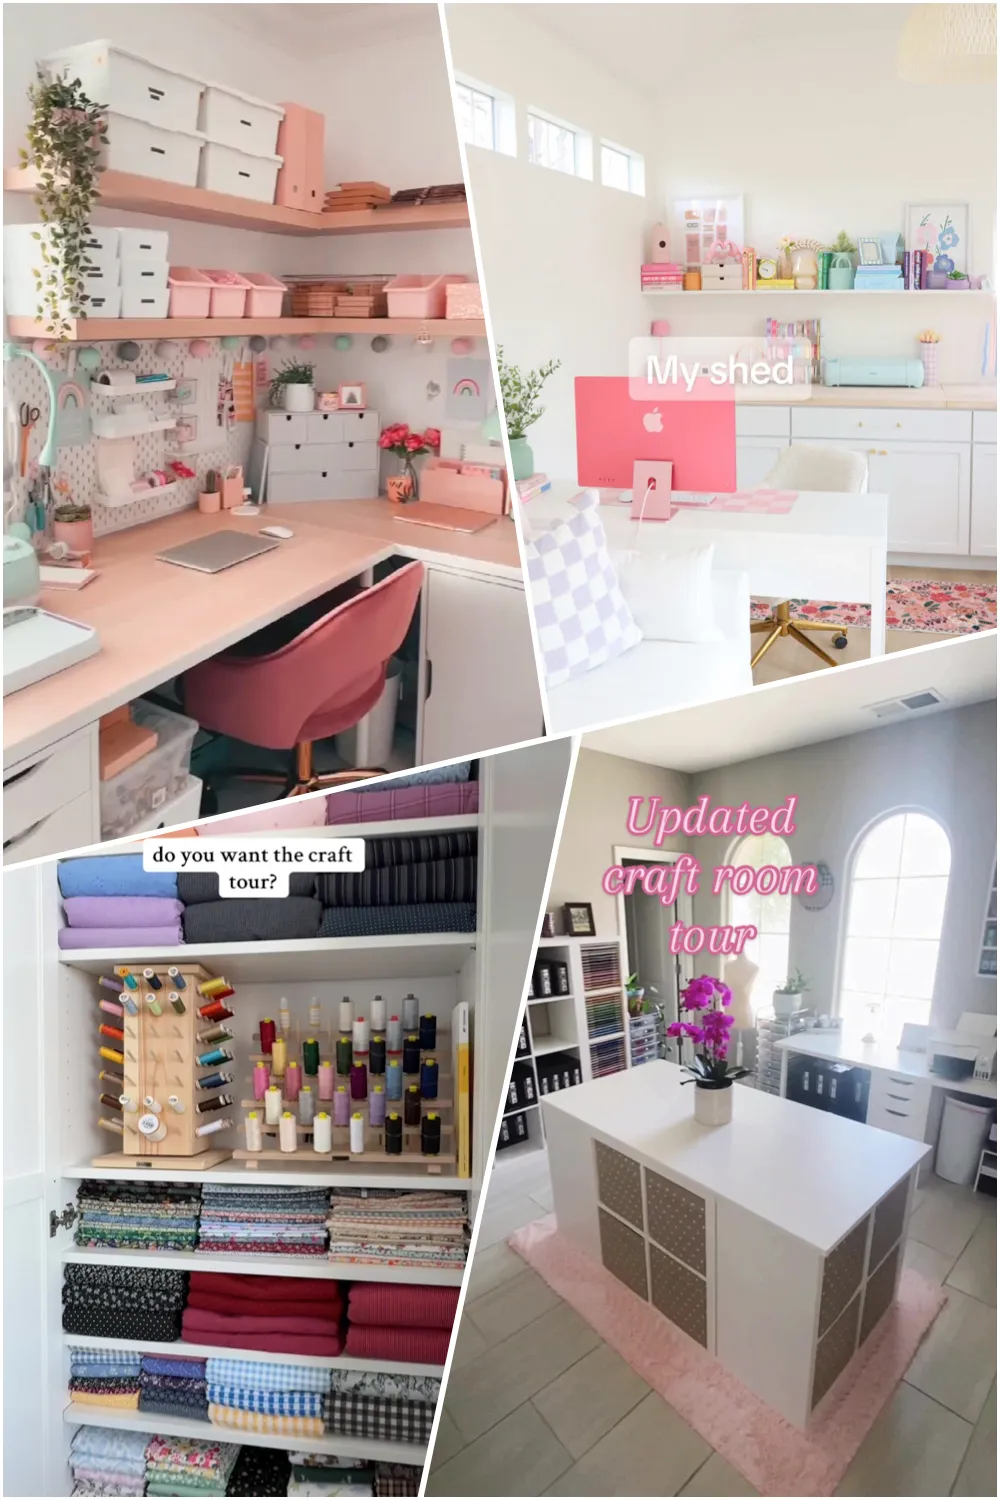
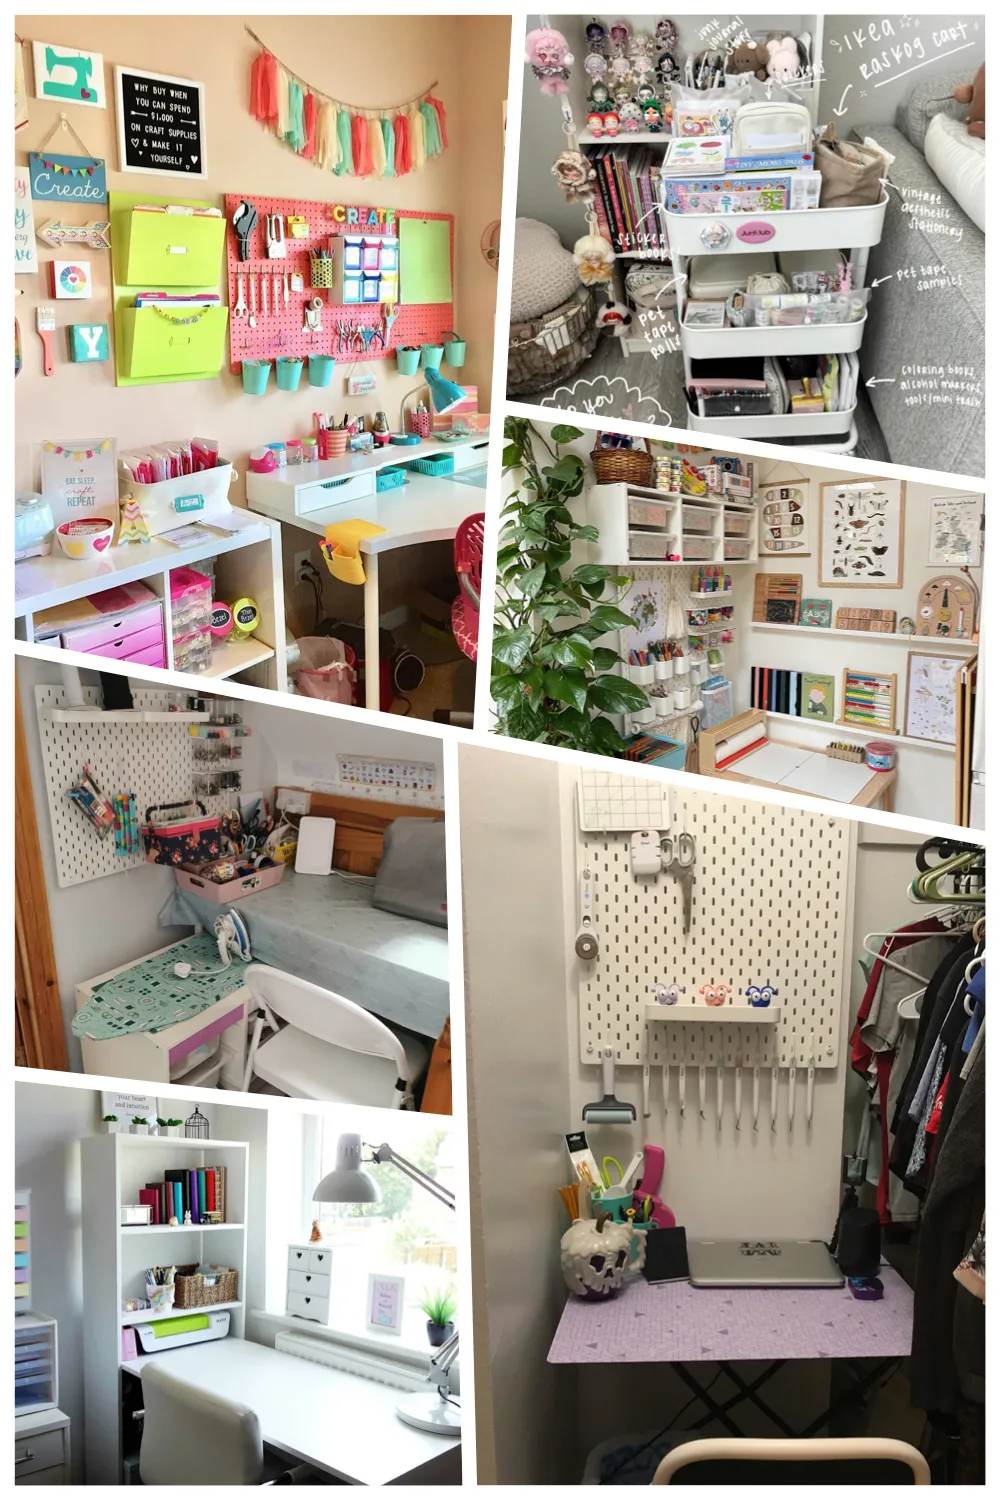
Compact drawer storage with labeled sections keeps everything organized — perfect for separating fabric, felt, and pre-cut images.
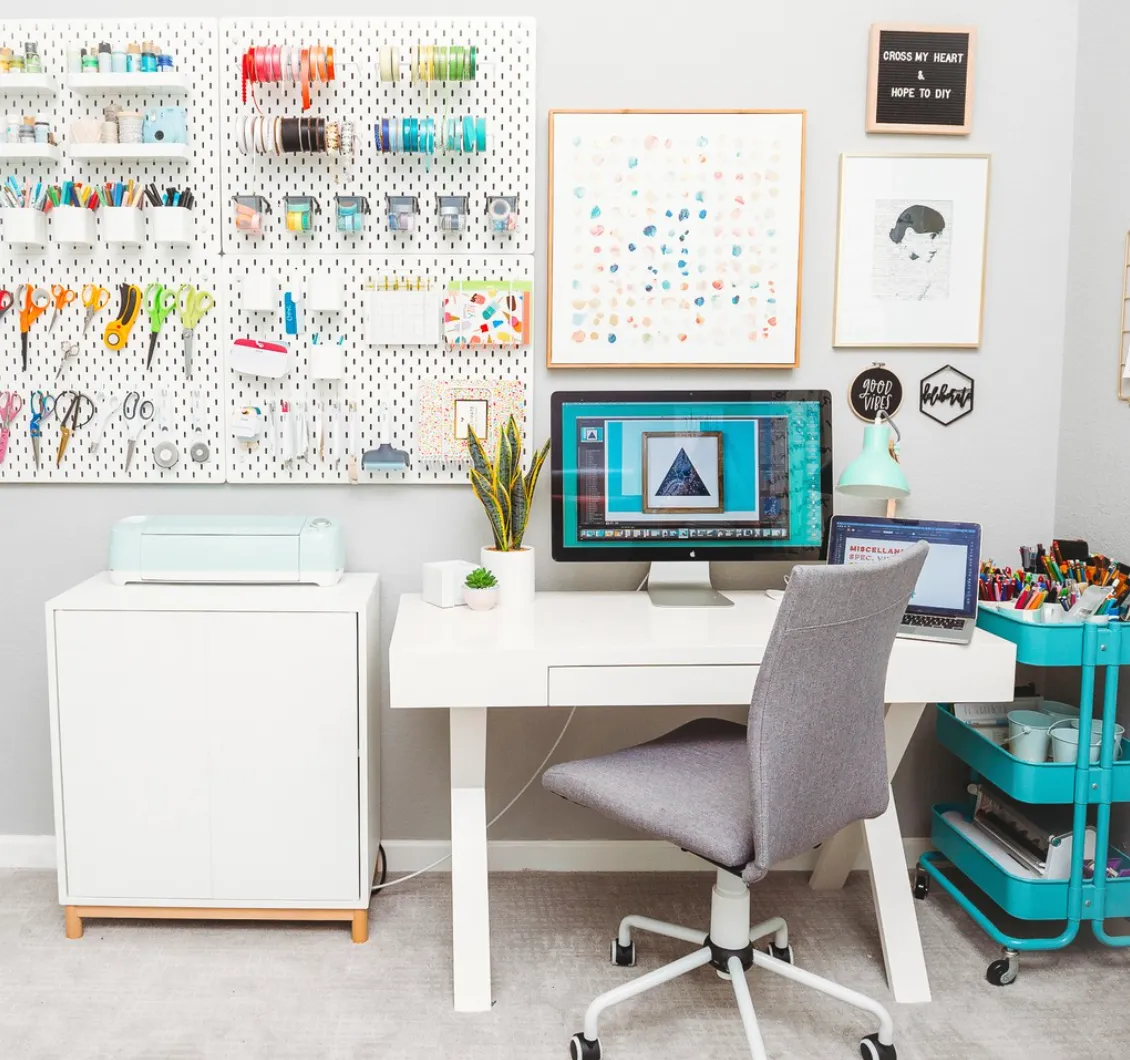
A pegboard wall steals the show in this craft space, offering dedicated hooks for scissors, washi tape, and even mini storage bins. Add in a rolling cart for mobile storage, and you’ve got an organization dream!
Framing the pegboard with ornate molding turns it into a functional yet decorative centrepiece. Bonus points for the pastel pink bins below, which combine style with hidden storage!
Need more craft room inspo? Check out these Craft Room Ideas you’ll want to copy!
Decluttering Tips for Crafters
Before you organize, you need to declutter. A tidy system built around too much stuff will fall apart fast.
1. Sort Supplies Into Three Piles
Keep — supplies you actually use and love. Donate — good condition but unused. Toss — broken tools, dried-up paints, anything past its useful life.
Pro tip: If you’re on the fence, ask yourself: have I used this in the last year? If not, let it go.
2. Donate Responsibly
One crafter’s cast-offs are another’s treasure.
- Schools — teachers love markers, paper, glue sticks, and scissors for art projects
- Community centres — many run crafting programmes and welcome yarn, fabric, and tools
- Friends or craft groups — pass along fabric or paints to someone who’ll use them
3. Limit Duplicates
Test all pens and markers and toss the dried-out ones. Keep your best pair of scissors and donate the rest. Fabric scraps and paper offcuts that don’t have an obvious use can go.
Pro tip: Store duplicates of essentials (scissors, glue sticks) in one clearly labelled spot so you always know where to find them.
4. Make Decluttering a Habit
Do a quick tidy after every project and set aside 15–30 minutes every month to reassess what you’re using. Keeping clutter in check consistently is far easier than a big annual clear-out.

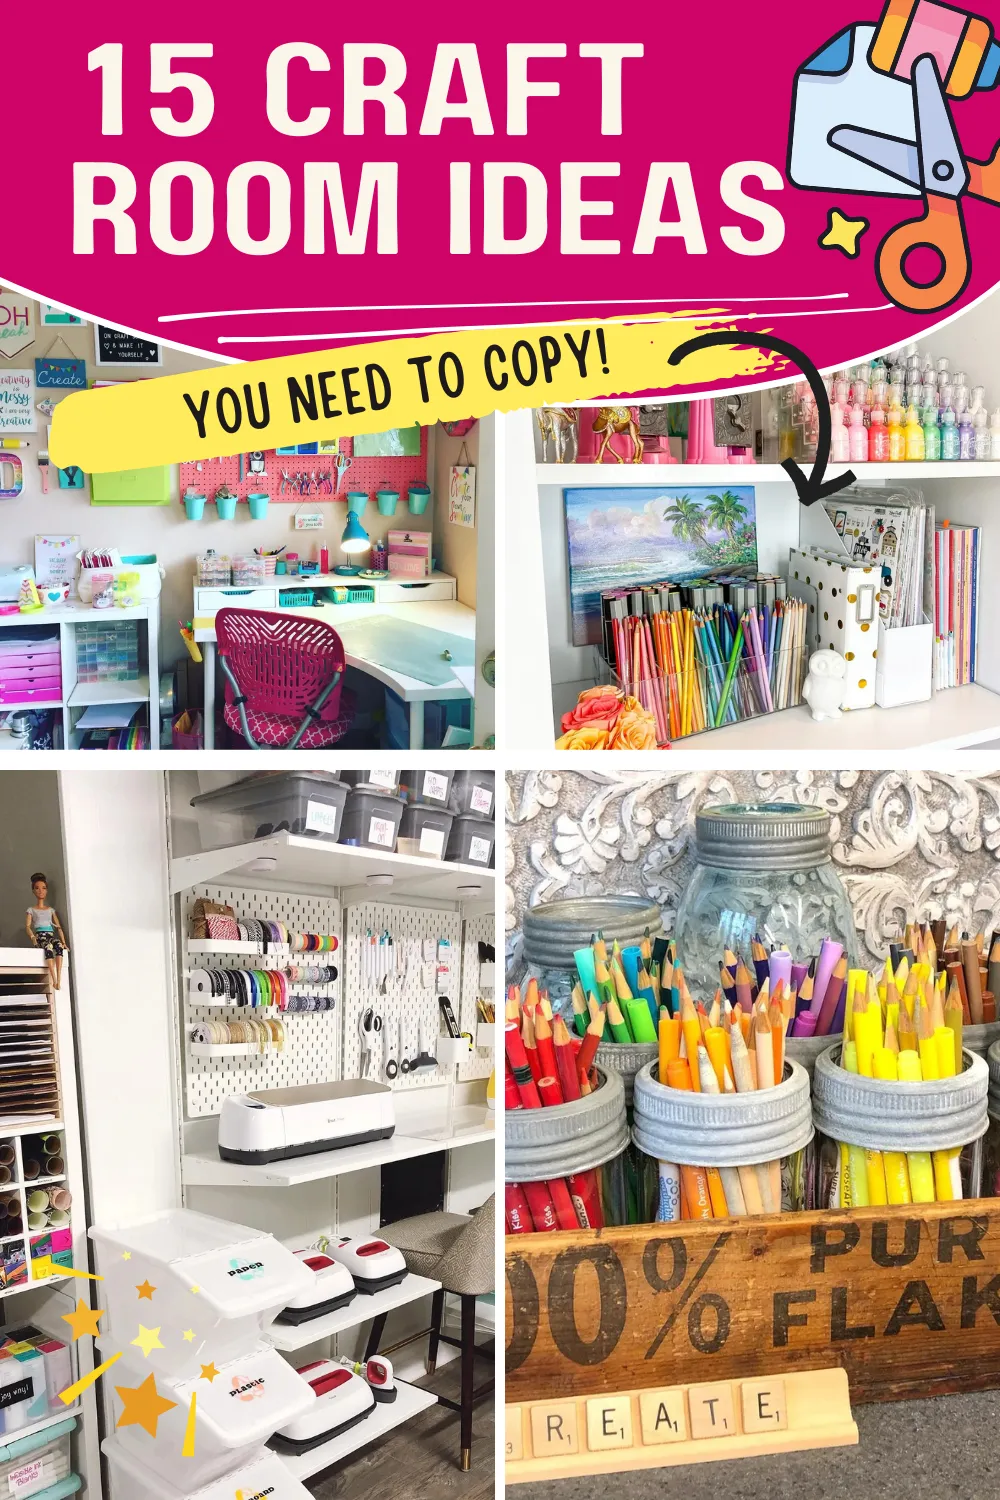
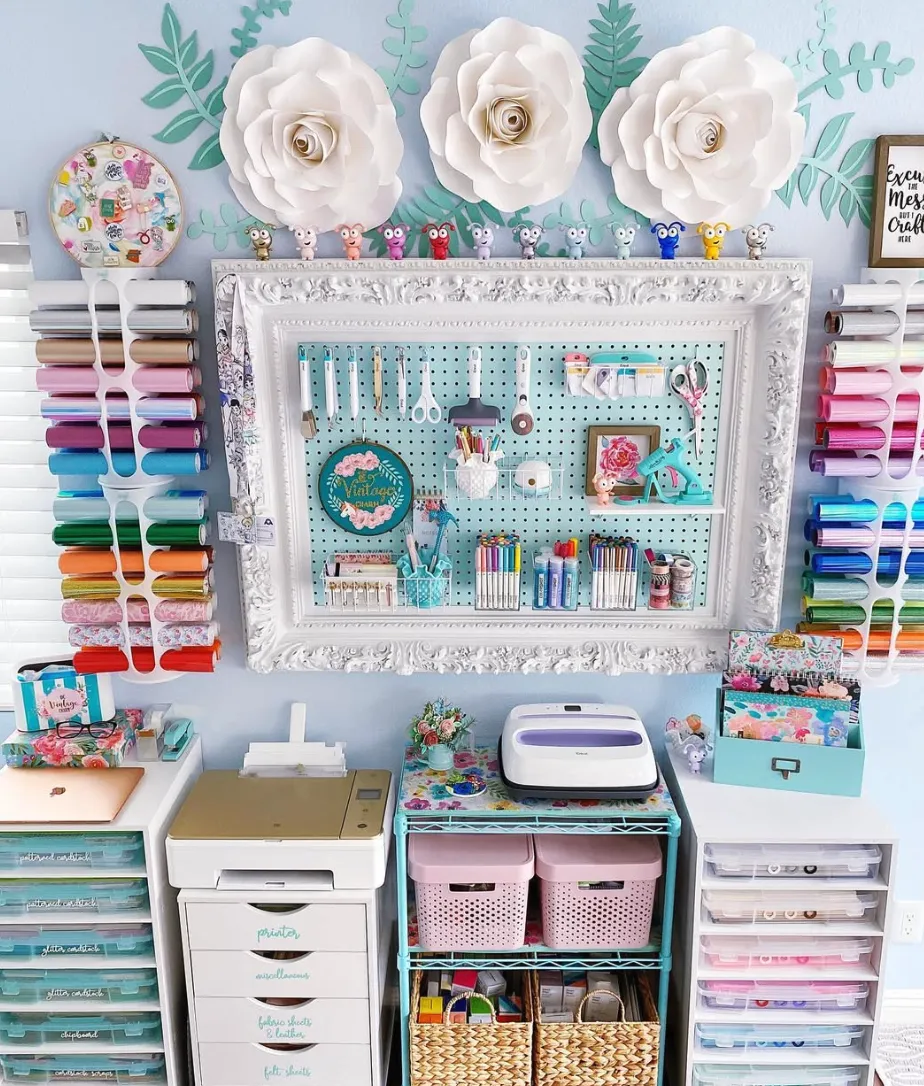
This setup makes use of every inch with a pegboard mounted above the desk for tools and embellishments, while the labeled bins on the shelf above add a chic, uniform look.
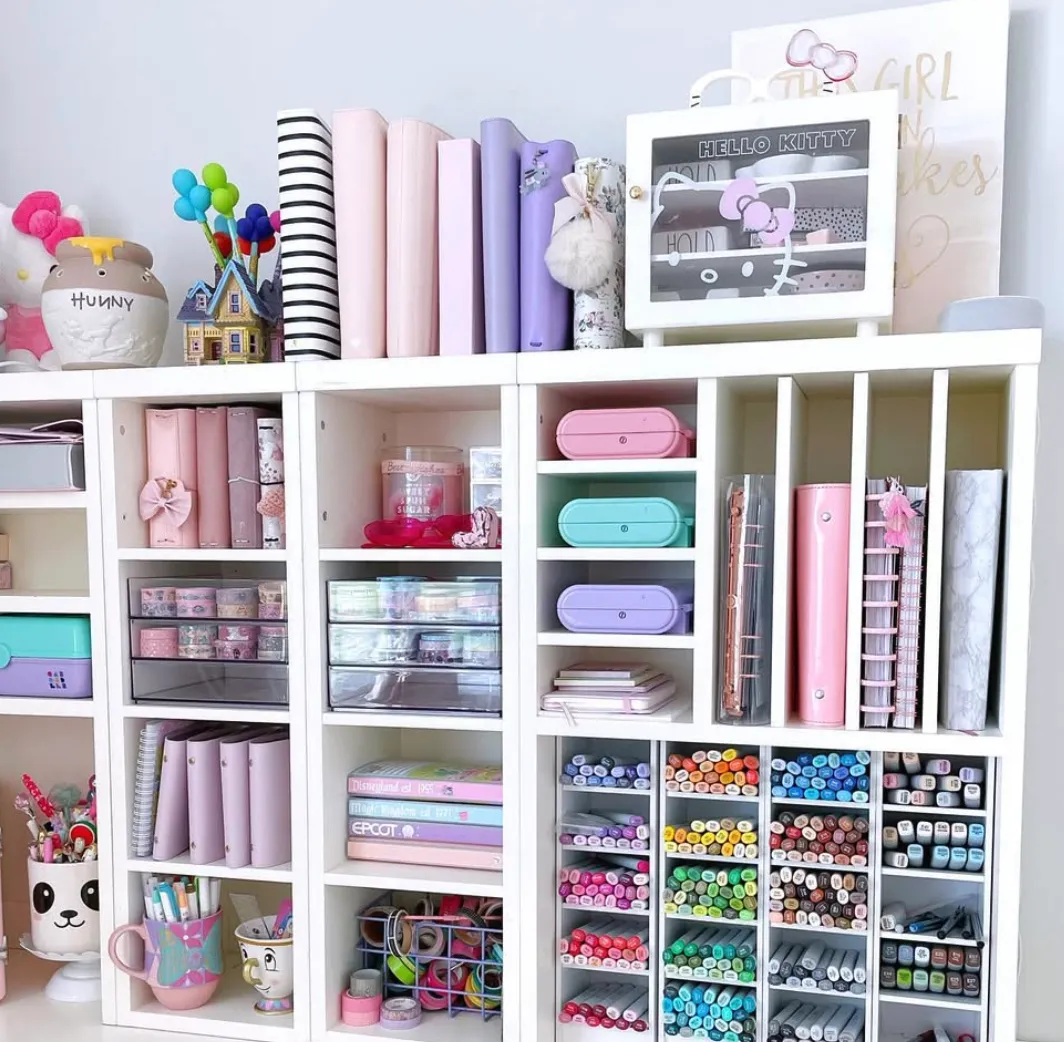
Color-coded pens, markers, and crafting tools stored in cubbies make this space a feast for the eyes. The upright storage for vinyl rolls is a great way to save desk space!
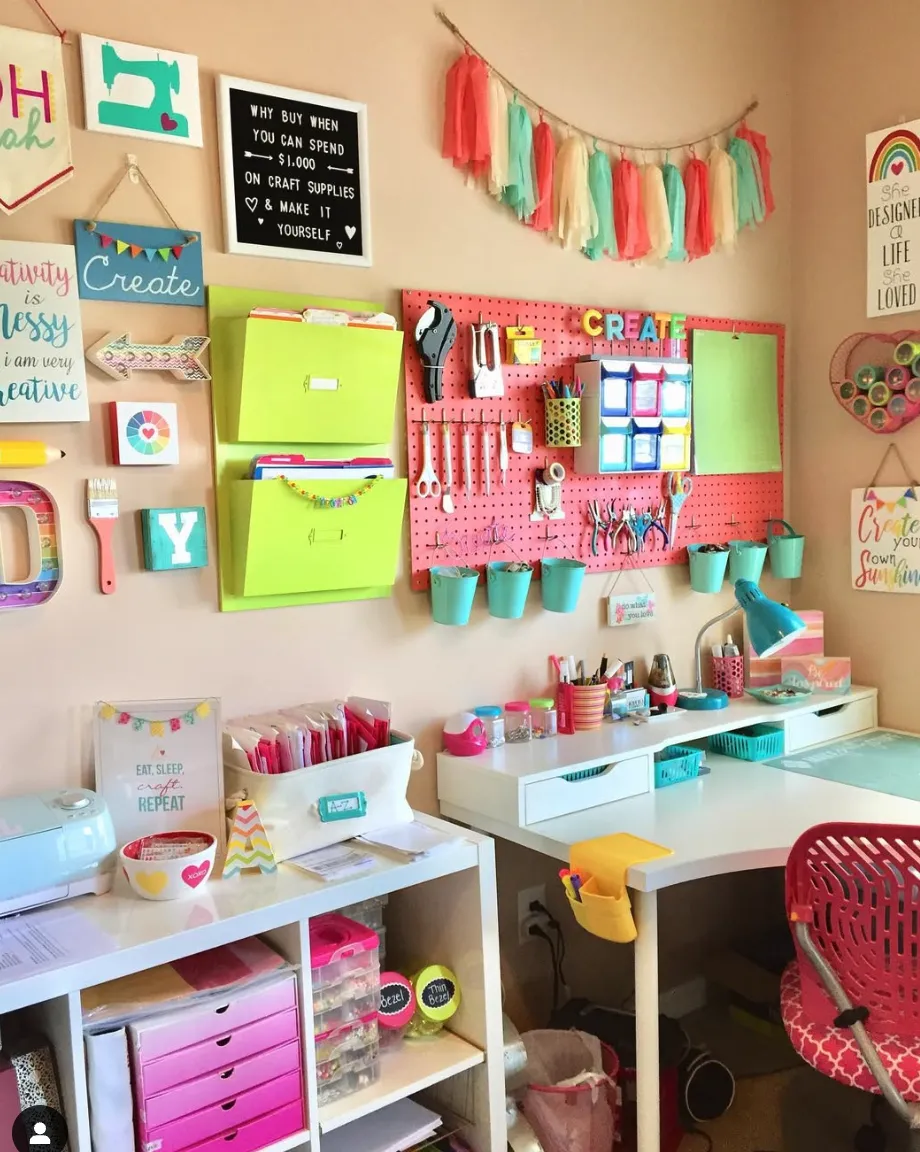
Bright and cheerful! This pink pegboard offers a pop of color and plenty of room for craft tools, while the attached buckets keep smaller supplies tidy and accessible.
Clever Storage Solutions for Small Spaces
These are the practical solutions that make a small craft room feel spacious and efficient.
1. Go Vertical
When floor space is limited, walls become your best storage real estate.
- Floating shelves — install wall-mounted shelves to store boxes, jars, or baskets. Keep everyday tools at eye level, seasonal supplies higher up.
- Pegboards — customizable and perfect for scissors, rulers, and washi tape. Add hooks, baskets, or small shelves for supplies of various sizes. See our full craft room pegboard ideas post for inspiration.
- Hanging wall rails with buckets — great for quick access to pens, brushes, or small tools.
2. Use Multi-Purpose Furniture
Every piece of furniture in a small craft room should earn its place.
- Desks with built-in drawers, cubbies, or shelves
- A small cabinet with a fold-out table for a compact crafting station
- Storage ottomans that double as seating while hiding yarn or fabric scraps inside
3. Clear Bins and Labels
Visibility is everything when organizing small items.
- Stackable clear bins keep beads, buttons, and embellishments dust-free and easy to find
- A label maker keeps everything looking consistent and makes the system easy to maintain
- Colour-code bins by category (blue for sewing, green for painting) for instant identification
4. Over-the-Door Organizers
The back of your door is prime storage space that’s easy to overlook.
- An over-door pocket organizer is perfect for small tools, spools of ribbon, or glue sticks
- Over-door hooks hold tote bags filled with larger supplies like fabric or paper rolls
- A clear pocket shoe organizer works brilliantly for brushes, markers, or tape rolls
5. Magnetic Strips
Small but mighty — especially for metal tools.
- A magnetic tool strip mounted on the wall or side of a desk holds scissors, tweezers, and needles
- Pair with magnetic tins to store pins, thumbtacks, and other small items
6. Rolling Carts
Mobile storage is a game-changer for small craft rooms.
- A tiered rolling cart can store frequently used supplies and roll out of sight when not needed
- Group supplies by project type on each tier (scrapbooking on one, painting on another)
- Add small cups or organizers to each tier for extra compartments
7. A Few More Ideas Worth Trying
- Under-desk storage — shallow bins or trays slide neatly under your desk for overflow supplies
- Wall-mounted fold-down table — for ultra-small spaces, this creates a full workspace that folds away flat
- Lazy Susans — inside a cabinet or on the desk for easy access to adhesives, paints, or small jars
For more storage ideas across every type of craft room, check out our craft room organization ideas post.
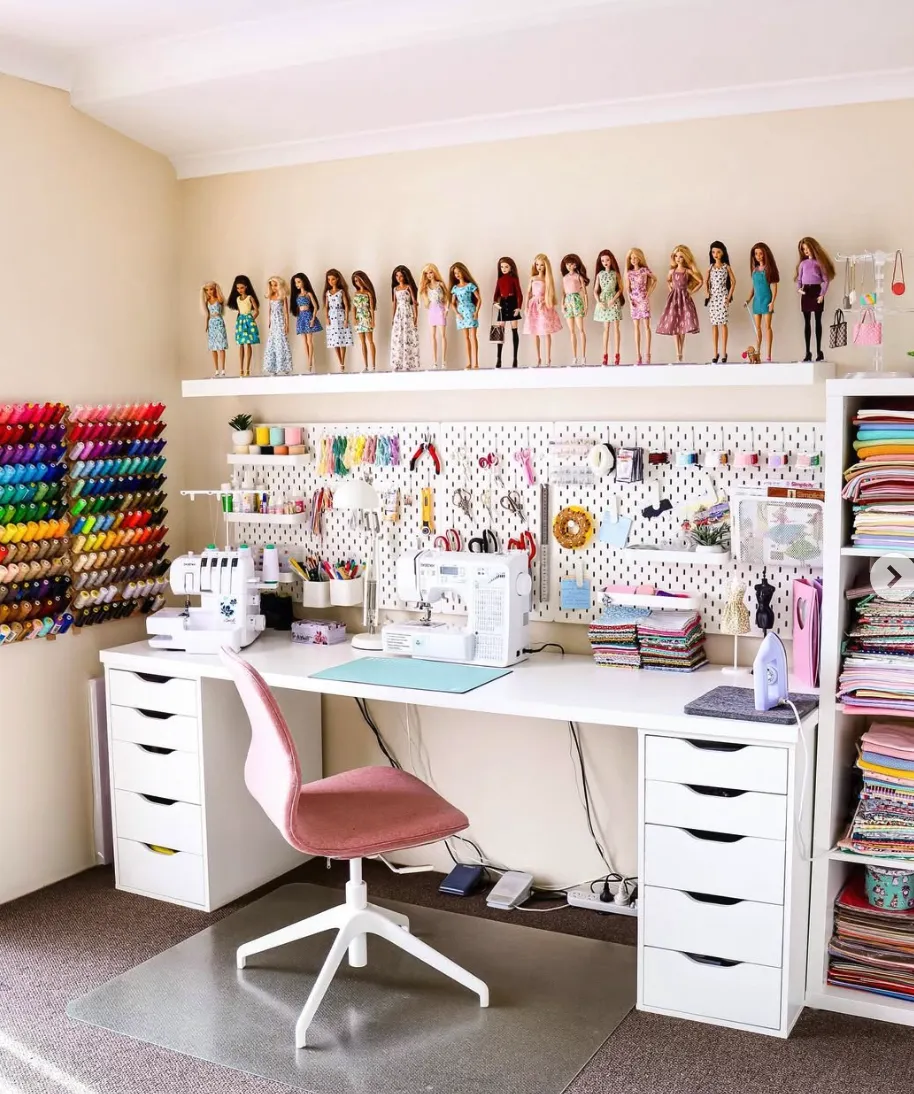
A dual pegboard setup works wonders for sewing supplies, while the nearby shelf for fabric keeps everything neatly organized and ready for your next project.
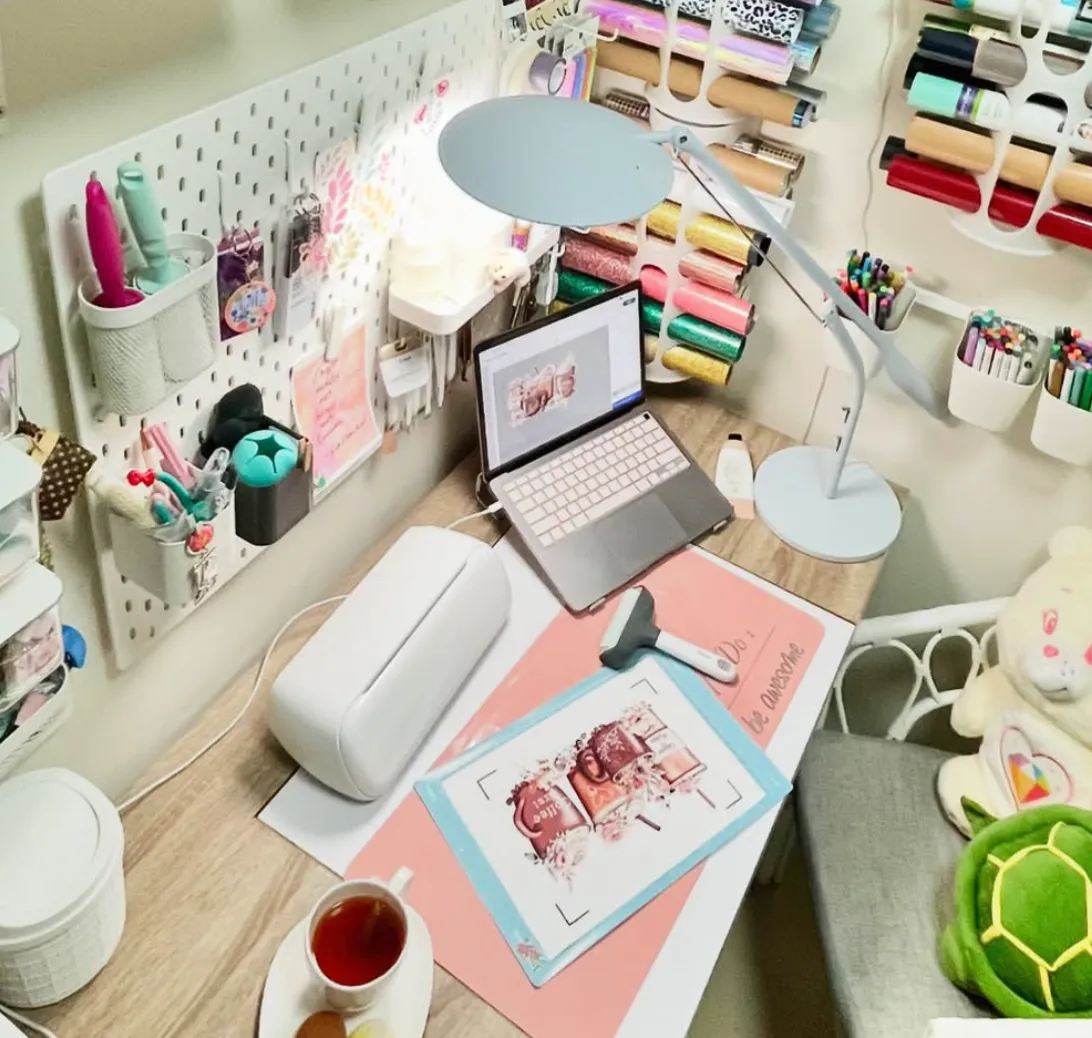
This small desk nook makes the most of vertical space with a pegboard for tools and shelving for ribbons and jars. The mounted tablet adds a modern, tech-savvy touch!
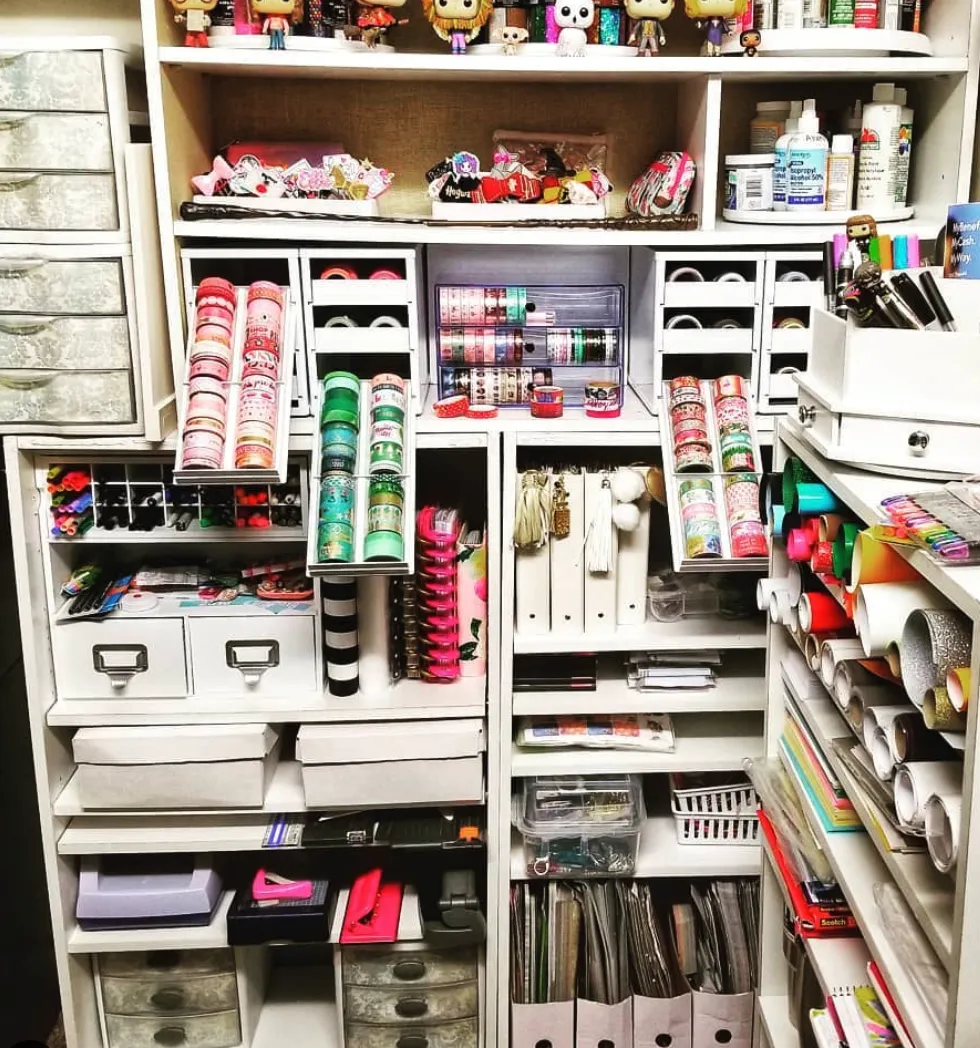
Compact shelving with pull-out bins ensures even the tiniest supplies have a home. The labeled sections and tiered washi tape storage make this setup ultra-functional.
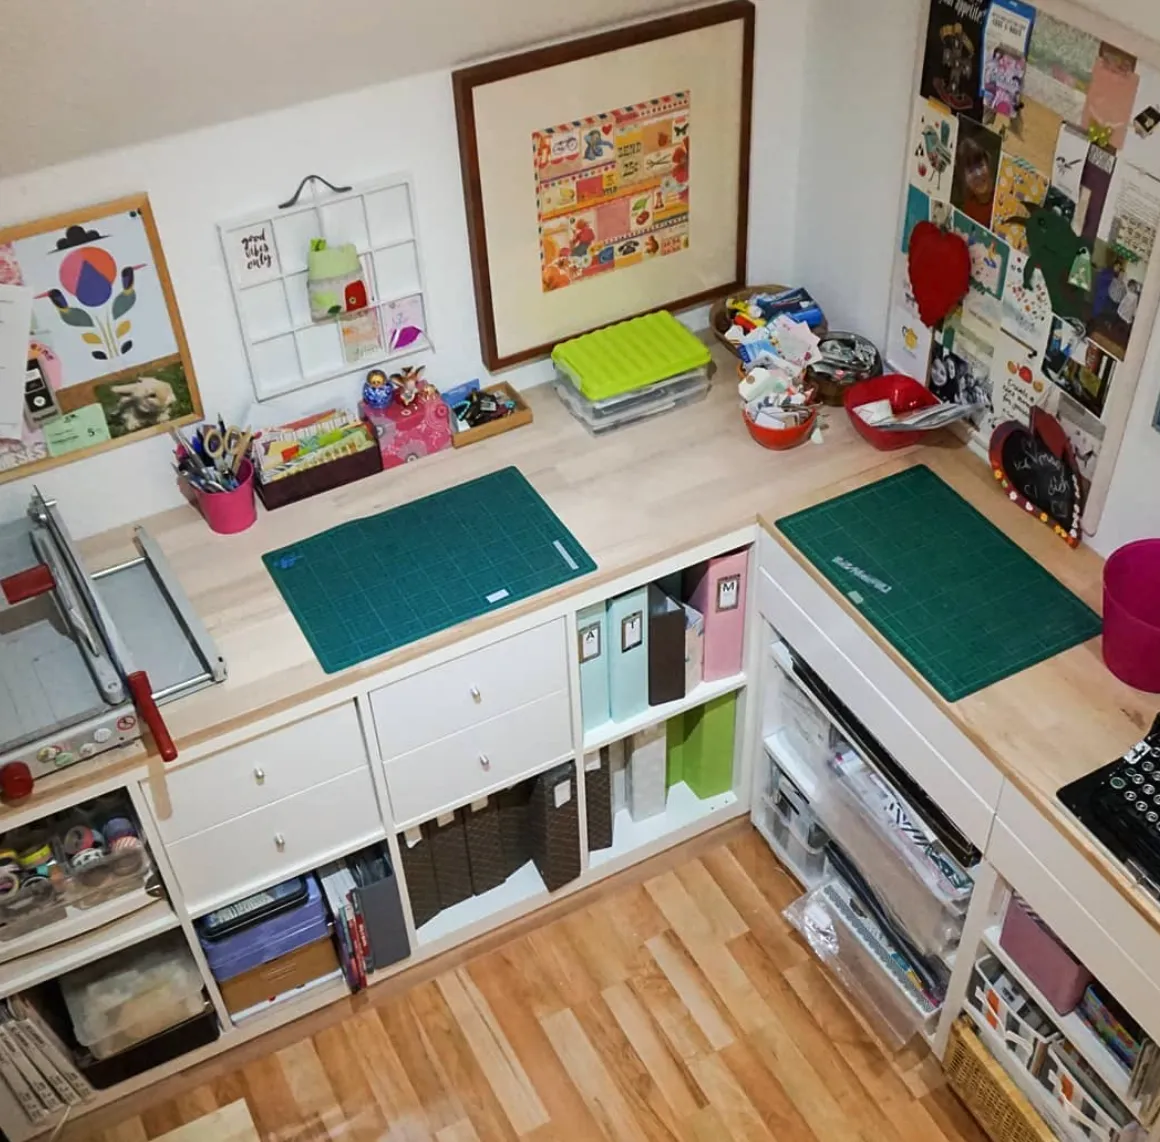
Corner workspace goals! Multiple work surfaces and built-in storage keep this space tidy while still offering room to spread out for larger projects.
Setting Up Work Zones
Even in the smallest craft rooms, dividing your space into distinct zones for different activities saves a surprising amount of time and frustration.
1. Cutting Zone
- What you need: Self-healing cutting mat, rotary cutter, rulers, scissors, measuring tape
- Set it up: Store tools in a small container near your cutting surface. A foldable cutting mat is handy for limited desk space.
2. Sewing Zone
- What you need: Sewing machine, threads, needles, bobbins, fabric, pins
- Set it up: Machine on a sturdy table with a nearby drawer for supplies. Use a pegboard or wall hooks to hang threads and bobbins. If space is tight, store the machine on a rolling cart and tuck it away between sessions.
3. Painting Zone
- What you need: Paints, brushes, palettes, canvas, water jars
- Set it up: Use trays or baskets to organize paints and brushes. Keep a rag or paper towels handy. A tabletop easel keeps artwork upright and saves desk space.
4. Paper Crafting Zone
- What you need: Paper, stamps, punches, adhesives, embellishments
- Set it up: Stacking bins or drawers for paper sorted by colour or pattern. Smaller items like stamps and stickers in labelled boxes. A paper trimmer with built-in storage for your most-used tools.
5. Portable Workstations for Very Tight Spaces
If your space is shared or tiny, portable zones are the answer.
- Trays or caddies — organize supplies for one craft type and move the whole tray to wherever you’re working
- Rolling carts — a mobile workstation you can roll out and put away as needed
- Foldable surfaces — a drop-leaf desk expands when you need it and collapses when you don’t
Lighting and Comfort Tips
Good lighting and a comfortable setup make the difference between a space you enjoy working in and one that gives you a headache after an hour.
1. Lighting
- Task lighting: A daylight desk lamp gives true-to-colour light — essential for matching fabrics or working on detailed projects
- Space-saving options: LED strip lights or clip-on lamps attach to shelves or walls without taking up desk space
- Overhead: If possible, swap for a bulb with adjustable brightness or add a pendant light for better overall illumination
Pro tip: Position your light source to minimise shadows. If you’re right-handed, lamp on the left; if left-handed, lamp on the right.
2. Comfort
- Chair: An ergonomic chair that supports your back and allows your arms to rest at a 90-degree angle makes long sessions much more manageable
- Anti-fatigue mat: If you stand while cutting, an anti-fatigue mat reduces strain on your feet and legs considerably
- Temperature: A small fan or portable heater is worth it if your craft room is in a basement or attic
3. Small Touches That Make It Your Space
A soft throw on your chair, your favourite playlist, and a mug warmer for your tea or coffee — small things that make you actually want to spend time in there.
Maintenance Hacks for Staying Organized
The real challenge isn’t getting organized — it’s staying that way. These habits make it easy.
1. Tidy Up After Every Session
Spend 5–10 minutes at the end of each crafting session putting tools back, returning materials to their bins, and wiping down your workspace. It’s much easier to keep a tidy room tidy than to reset a chaotic one.
2. Keep a Bin Within Arm’s Reach
A small desktop trash bin near your workstation means scraps and packaging don’t pile up on your desk. For sewing projects, a mini thread catcher or small container for fabric trimmings is a simple upgrade.
3. Label Everything
If a bin doesn’t have a label, it becomes a dumping ground. Use a label maker or handwritten tags on all bins, drawers, and boxes. For clear containers, label the front or lid so you can read it at a glance without opening anything.
4. One In, One Out
For every new supply you bring in, aim to remove something you no longer use. Craft supplies have a way of multiplying, and this rule keeps the system from gradually filling up again.
5. Monthly Declutter
Set aside 15–30 minutes once a month to sort through supplies, reorganize anything that’s shifted, and check that labels are still accurate. It’s a small time investment that prevents a much bigger job building up.
6. Use Visual Cues
Store frequently used items in clear containers or open bins so they’re always easy to spot. Arrange supplies by colour, type, or project for a setup that’s both visually pleasing and functional.
7. Reset After Big Projects
After finishing a large project, designate a reset session — put everything back in its place and refresh the space before starting something new.
A well-organized small craft room doesn’t happen by accident, but it also doesn’t require a huge room or a big budget. Get your zones set up, get your storage working vertically, and build in the small habits that keep things tidy — and you’ll spend a lot more time actually making things.
Looking for more craft room ideas? You might also like:
- Craft Room Pegboard Ideas
- Craft Room Organization Ideas
- Craft Room Design Tips and Photo Inspiration